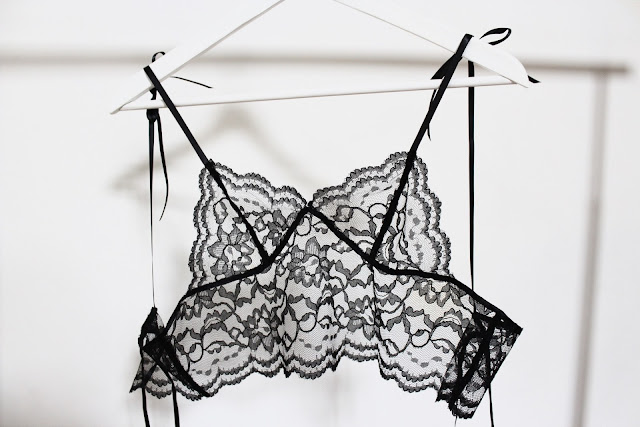
DIY Lace Bralette
Download the Pattern with the links below:
(These links lead to a page on my old website which I don't pay for hosting anymore.. I'm trying to solve the issue here! In the meantime I'm only able to upload the .jpgs so the sizing probably won't be accurate unless you bring the photo into Illustrator, Photoshop, Word, Or PowerPoint and resize the image there so the guideline measurement matches one on your screen- then don't scale when printing)
First click “Open in PDF Preview” and when printing, do not “scale to fit/fit to page” – instead, print at 100% and do not scale the image down. You can check if your pattern printed the correct size by measuring the line next to each pattern piece.
Note: This is what I patterned for my body but it can be easily adjusted depending on your bust and waist. The pattern is made for a B cup: 33″ bust, 25″ waist
If you have a larger cup size than a B cup:
Try adding increments of 1/4″ all the way around both of the bust cups until you find the correct size for you (Pattern pieces #1 and #2). Note: the princess seam is supposed to fall over your “apex” aka your nipple. Add along the princess line (where the lengthwise seam allowance is) to change where this seam falls, and add around the cups to adjust for your bust size and desired look. (See last image below)
If you have a larger bust or waist than the pattern:
You can add to the side seams (Pattern pieces #3 and #4)
First, (Your bust measurement) – (33″) = x
Ex) 35″ – 33″ = 2″
Next, (the difference) / 4
2”/4 = 1/2” (because we only patterned one half of the front and back bodice)
→ add 1/2″ to both side seams at the bust
(1/2″ + 1/2″ = 1″ added to each bodice pattern piece, which when used twice [ex. Cut 2 for the back bodice, and cut one on the fold for the front bodice] will equal a total of 2″ added to the finished garment for the bust)
Next, (Your waist measurement) – (25″) = x
Ex) 28″ – 25″ = 3″
Then, (the difference) / 4
3”/4 = 3/4”
→ add 3/4” to both side seams at the waist
(3/4″ + 3/4″ = 1.5″ x 2 = 3″ added to the waist)
Then, connect your adjusted bust side seam to your newly adjusted waist side seam
You can add or subtract from the center back depending on how close/far you want your center back pieces to meet after being tied by the ribbon (Pattern pieces #3 and #4)
You can also edit the length of the bralette as desired by adding or subtracting from the bottom of the bodice pattern (Pattern pieces #3 and #4)
Materials:
Pattern
Scalloped-edge lace (keep in mind you’ll only be using the edges)
Fabric scissors & clippers
Pins & needles (one needle for hand basting)
Ribbon/Material for straps
Fray Check (or similar)
Matching & Contrasting thread
Iron & Sewing machine
To begin:
Cut out all pattern pieces:
- Center Front Cup (2)
- Side Front (2)
- Front Bodice (1)
- Back Bodice (1)
Cups:
- Pin and sew the center front cup to the side front cup with right sides together
- Sew with your machine and repeat for the other cup
- Make a few clips within the seam allowance in the areas that are the most curved
- These will help the seam allowance lay flat and open
- Press the seams open
- Decide how long you want the front straps to be (they’ll be tied with the back ones to make a bow)
- Mine are 12” plus the length of the princess seam
- Cut two straps of the same length
- Optional: Hand baste the strap along the princess seam for easier/more accurate machine sewing
- Use your machine to sew the ribbon to the princess seam
- Remove the basting stitches and press
Sewing the cups to the bodice:
- Pin one cup to the center front bodice with right sides together
- Sew the cup to the bodice
- Pin the second cup to the center front bodice with right sides together
- Sew the cup to the bodice
- Press the seam allowance upward
Side seams & the center back:
- Pin and sew together the bodice side seams, with right sides together
- Press the side seams open
- Cut a piece of ribbon long enough to cover the side seam
- Cut two, and sew them to the side seams
- Trim the excess ribbon and press
- Trim the excess lace from the seam allowances
- Repeat the same process for the center back, and press
- Cut two pieces of ribbon and sew them to the center back
Finishing the bodice:
- Cut a piece of ribbon that is long enough to be sewn from center back to center back as shown
- Hand baste the ribbon along the top of the bodice sides and under the cups
- Sew and press
- Trim the excess lace
Back straps and ties:
- Decide where you want your back straps
- Mine are 1 ½” from the center back
- Sew the back straps to the bodice
- Decide how long you want your back closure ties
- Mine are 13” long
- Attach two back ties on each side
- Clip all ribbon ends into a shape you like
- Use Fray Check (or similar) and let them dry
- Repeat for all ribbon ends that may fray
- Tie your shoulder straps and you’re done!


